
cuckoo clock repair manual pdf
Cuckoo Clock Repair Manual PDF: A Comprehensive Guide
Discover a detailed‚ step-by-step repair manual‚ complete with photos and diagrams‚ dedicated to cuckoo clock owners seeking solutions for various issues.
This guide offers assistance‚ from basic troubleshooting to repairing musical components‚ ensuring your cherished timepiece continues to chime beautifully for years to come.
Understanding Cuckoo Clock Mechanisms
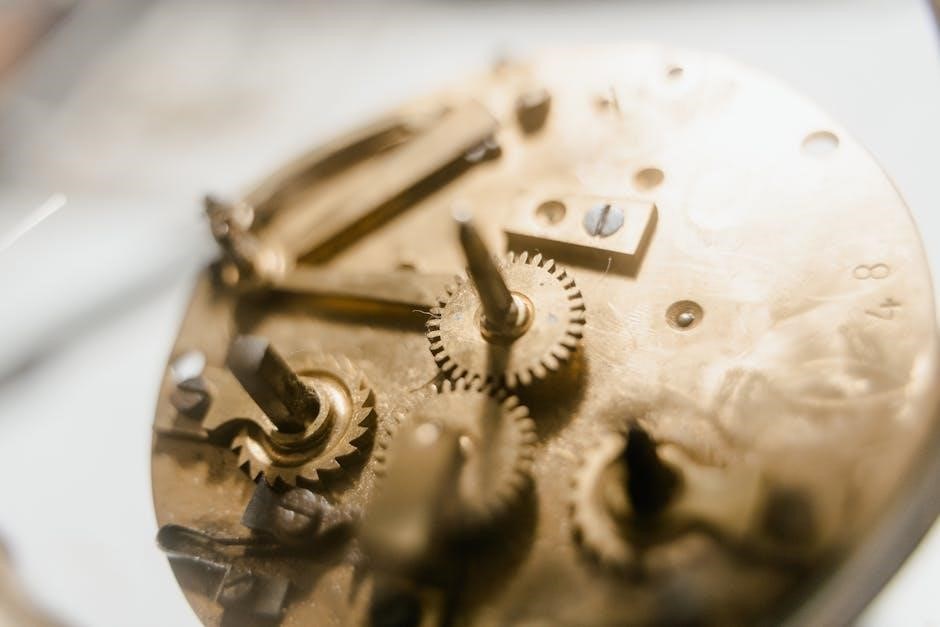
Cuckoo clock mechanisms are intricate systems relying on precise interplay between weights‚ gears‚ and a pendulum to accurately measure and display time. The core is typically a weight-driven movement‚ where descending weights power the clock’s functions.
These movements are broadly categorized as German or Black Forest and Swiss. German movements often feature more robust construction and a distinctive cuckoo call‚ while Swiss movements are known for their precision and musical additions.
The repair manual PDF will delve into the function of each component: the gear train‚ responsible for transferring power; the escapement‚ controlling the pendulum’s swing; and the bellows‚ powering the cuckoo’s call. Understanding these elements is crucial for effective repair‚ allowing you to diagnose issues and implement targeted solutions; Proper function relies on consistent lubrication and careful adjustment.
A detailed manual will illustrate these mechanisms.
Types of Cuckoo Clocks & Their Movements
Cuckoo clocks aren’t monolithic; they come in diverse styles‚ each with unique mechanical characteristics. Traditional Black Forest clocks‚ often featuring hand-carved housings‚ typically employ eight-day movements powered by pinecone-shaped weights. Chalet clocks‚ depicting scenes of Swiss mountain life‚ frequently incorporate musical elements alongside the cuckoo call.
Modern cuckoo clocks may utilize quartz movements for increased accuracy and reduced maintenance‚ though purists often prefer the authenticity of mechanical movements. The repair manual PDF will categorize these types‚ detailing the specific movements found within each.
Understanding these distinctions is vital for repair‚ as different movements require different approaches. The manual will provide diagrams and explanations of each movement type‚ aiding in accurate diagnosis and effective repair procedures. Identifying the movement is the first step to successful restoration.
Locating a Cuckoo Clock Repair Manual PDF
Finding a comprehensive cuckoo clock repair manual in PDF format requires a strategic approach. While some manufacturers offer manuals directly on their websites‚ a broader search often yields more results. Online forums and communities dedicated to clock repair frequently host shared resources‚ including scanned copies of vintage manuals.
Dedicated clock repair websites may also offer downloadable PDFs‚ sometimes for a fee. Exercise caution when downloading from unfamiliar sources to avoid malware. Look for reputable sites with positive user reviews.
A targeted Google search using keywords like “cuckoo clock repair manual PDF‚” “vintage cuckoo clock manual‚” or specific brand names can be effective. Remember to preview the PDF to ensure it covers your clock’s specific type and movement before relying on its instructions.
Common Cuckoo Clock Problems & Solutions
Address frequent issues like a silent cuckoo‚ synchronization problems‚ or irregular pendulum swings with detailed solutions found within dedicated repair manuals and online resources.
Cuckoo Not Calling: Diagnosing the Issue
When your cuckoo clock falls silent‚ a systematic approach to diagnosis is crucial. Begin by manually advancing the minute hand towards the next half or full hour‚ observing if the cuckoo emerges and calls. If not‚ the problem likely lies within the mechanism itself.
A comprehensive repair manual PDF will guide you through inspecting the bellows‚ the crucial component responsible for powering the cuckoo’s call. Check for tears or leaks‚ as damaged bellows significantly hinder operation.
Furthermore‚ examine the whistle mechanism; Ensure it’s securely fastened and free from obstructions. Some manuals detail how to carefully adjust or even replace the whistle if necessary. The connection between the bellows and the whistle is also vital; a disconnect prevents the air from producing sound.
Detailed PDFs often include diagrams illustrating the precise location of these components‚ simplifying the troubleshooting process. Remember to consult the manual specific to your clock’s movement type for accurate guidance.
Hour Hand & Minute Hand Synchronization Problems
Misalignment between the hour and minute hands indicates a disruption in the clock’s gear train. A repair manual PDF will illustrate the intricate connection between these hands and the movement’s core. Begin by gently winding the clock‚ observing if the hands attempt to synchronize.
If the issue persists‚ the manual will guide you through accessing the movement – typically by removing the clock face. Carefully inspect the gears for any visible damage‚ debris‚ or dried lubrication.
The minute hand directly drives the hour hand through a reduction gear. A PDF manual will show how to check this gear for slippage or wear. Often‚ simply cleaning and re-lubricating the gears can restore proper synchronization.
Advanced manuals may detail how to adjust the hour hand’s position relative to the minute hand‚ ensuring accurate timekeeping. Remember to proceed cautiously and consult diagrams for correct gear placement.
Pendulum Swing Irregularities & Adjustments
An irregular pendulum swing signifies an imbalance or obstruction affecting the clock’s timekeeping. A comprehensive repair manual PDF will detail how to diagnose and rectify these issues. First‚ ensure the clock is perfectly level; even a slight tilt can disrupt the pendulum’s arc.
The manual will illustrate how to check the suspension spring‚ the component connecting the pendulum to the movement‚ for kinks or damage. Adjusting the pendulum’s position using the rating nut – typically located at the bottom of the pendulum – alters the clock’s speed.
Turning the nut clockwise slows the clock‚ while counter-clockwise speeds it up. A PDF guide will demonstrate the precise adjustments needed for accurate time. Observe the swing; it should be equal in time to both sides.
If the swing is uneven‚ gently adjust the clock’s position on the wall or examine the movement for any obstructions hindering the pendulum’s motion.
Detailed Repair Procedures
Explore in-depth‚ illustrated guides for replacing suspension springs‚ adjusting whistles‚ repairing bellows‚ and fixing the cuckoo bird mechanism – all within the manual.
Replacing Worn Suspension Springs
Identifying a worn suspension spring is crucial; look for signs of stretching‚ kinking‚ or breakage. Carefully remove the old spring‚ noting its attachment points for correct reinstallation. Ensure the clock weights are fully supported during this process to prevent damage to the movement.
Select a replacement spring of the exact same length and gauge as the original. Incorrect sizing can severely impact the clock’s timekeeping accuracy. Gently thread the new spring through the suspension loop and secure it at both ends‚ ensuring it’s properly seated.
Test the spring’s tension by slowly releasing the weights. Observe the pendulum’s swing; it should be smooth and consistent. Adjust the pendulum’s position if necessary to regulate the clock’s speed. Refer to the manual’s diagrams for precise spring placement and tensioning guidelines. Proper installation is vital for reliable operation.

Adjusting the Whistle Mechanism
Begin by carefully accessing the whistle assembly‚ typically located within the clock’s housing. Inspect the whistle and its associated bellows for any signs of damage or wear. Most clocks utilize a small screw and nail to secure the whistle; loosen these carefully.
Adjust the whistle’s position slightly to alter the pitch of the cuckoo call; Small adjustments can make a significant difference. If the whistle is glued‚ gently snap or cut it free‚ being mindful not to damage surrounding components. Ensure the air flow to the whistle is unobstructed.
Retighten the securing screw and nail‚ testing the cuckoo call after each adjustment. Listen for a clear‚ consistent sound. Refer to the clock’s manual for specific instructions related to your model. Proper adjustment ensures the authentic cuckoo sound is maintained.
Repairing or Replacing Bellows
Bellows are crucial for the cuckoo’s call; inspect them for cracks‚ tears‚ or stiffness. Minor tears can sometimes be carefully patched with thin‚ acid-free paper and appropriate adhesive‚ ensuring airtight seals. However‚ severely damaged bellows generally require replacement.
When replacing‚ carefully note the bellows’ original configuration and attachment points. New bellows must be properly fitted to the air pipe and frame‚ ensuring a secure and airtight connection. Use the correct type of bellows material – traditionally‚ leather or a specialized fabric is used.
Test the bellows’ operation after installation by manually compressing and releasing them. Listen for smooth‚ consistent air flow. Properly functioning bellows are essential for a clear and reliable cuckoo call. Refer to detailed diagrams in the repair manual for accurate installation.
Fixing the Cuckoo Bird Mechanism
The cuckoo bird’s movement relies on a delicate interplay of levers and pivots. If the bird doesn’t emerge or appears sluggish‚ carefully inspect the mechanism for obstructions or binding points. Lubricate pivots with a clock-specific oil‚ avoiding over-application.
Check the connection between the bellows and the bird’s operating rod. Ensure the rod moves freely and isn’t bent or damaged. Adjust the rod’s length if necessary to synchronize the bird’s appearance with the cuckoo call.
Examine the bird’s internal weights and pendulum for proper function. A repair manual’s diagrams are invaluable for understanding the complex arrangement. Carefully reassemble components‚ ensuring correct alignment. Test the mechanism repeatedly to confirm smooth‚ reliable operation.

Troubleshooting Musical Components
Address music box issues and automatic night shut-off malfunctions with detailed guidance. Repair manuals provide diagrams for diagnosing and resolving these complex musical features.
Repairing the Music Box Mechanism
Diagnosing a faulty music box within a cuckoo clock requires careful attention. A comprehensive repair manual PDF will guide you through identifying common problems‚ such as a jammed comb or a loose governor. Begin by gently removing the music box assembly‚ noting the position of all gears and levers – photographs are invaluable here!
Inspect the metal comb for bent or broken teeth; these often cause silence or distorted melodies. Carefully straighten bent teeth with fine pliers‚ or replace damaged ones if possible. The governor‚ responsible for regulating the music’s speed‚ may need cleaning or adjustment. Ensure it spins freely without obstruction.
Lubricate all moving parts with clock oil‚ avoiding excessive application. Reassemble the music box‚ verifying that all components are correctly positioned. A detailed manual will provide exploded diagrams for accurate reassembly. Test the mechanism thoroughly‚ listening for a clear and consistent melody. If issues persist‚ consult a qualified clock repair technician.
Addressing Issues with Automatic Night Shut-Off
Automatic night shut-off mechanisms‚ common in many cuckoo clocks‚ can malfunction‚ preventing the clock from silencing at night or failing to chime altogether. A detailed repair manual PDF will illustrate the components involved – typically a lever system connected to the bellows and a silencing shuttle.
Troubleshooting begins with inspecting the lever for damage or obstruction. Ensure it moves freely and engages correctly with the silencing shuttle. Check the shuttle itself for wear or misalignment; it must fully engage to silence the cuckoo. Lubricate all moving parts with clock oil‚ being careful not to contaminate the bellows.
If the mechanism remains unresponsive‚ examine the linkage connecting the lever to the bellows. Adjust the linkage to ensure proper timing and engagement. A comprehensive manual provides diagrams for correct adjustment. Test the night shut-off repeatedly to confirm reliable operation. Persistent issues may require professional attention.
Maintenance & Preventative Care
Regular cleaning‚ proper placement‚ and careful winding are crucial for longevity. A repair manual PDF details leveling‚ lubrication‚ and battery handling for optimal performance.
Proper Clock Placement & Leveling
Ensuring your cuckoo clock is correctly positioned is paramount for accurate timekeeping and smooth mechanism operation. A comprehensive repair manual PDF emphasizes selecting a sturdy wall‚ away from direct sunlight‚ extreme temperatures‚ and humidity fluctuations.
Leveling is critical; use a spirit level to verify the clock hangs perfectly vertical. If the clock isn’t level‚ the pendulum’s swing will be uneven‚ impacting accuracy and potentially causing wear. The manual details how to check the pendulum’s swing – it should take equal time to swing to the left and right.
Adjustments can be made by subtly shifting the clock’s position or using small shims behind the mounting bracket. Consistent monitoring and minor adjustments‚ as outlined in the PDF guide‚ will prevent future issues and prolong the life of your treasured cuckoo clock.
Remember‚ a stable and level foundation is the first step in preventative care.
Regular Cleaning & Lubrication
Maintaining a cuckoo clock’s intricate mechanism requires consistent cleaning and lubrication‚ as detailed in a thorough repair manual PDF. Dust accumulation is a primary enemy‚ hindering smooth operation and accelerating wear.

Cleaning should be gentle – use a soft brush or compressed air to remove dust from visible components. Avoid liquids‚ which can damage delicate wood and corrode metal parts. The PDF guide recommends specific‚ clock-safe lubricants for gears and moving parts.
Lubrication frequency depends on the clock’s environment and usage‚ but annual application is generally advised. Over-lubrication is as detrimental as under-lubrication‚ attracting more dust. The manual provides precise instructions on lubricant application points‚ ensuring optimal performance and longevity of your cuckoo clock.
Follow the guide for best results!
Battery Removal & Clock Winding Procedures
A comprehensive cuckoo clock repair manual PDF emphasizes proper battery handling and winding techniques for optimal functionality. For quartz-movement clocks‚ the manual details safe battery removal procedures‚ advising against mixing old and new batteries.

Mechanical clocks require regular winding‚ typically every 7-8 days‚ though this varies by model. The PDF illustrates the correct winding direction – clockwise for the minute hand – until a slight click is felt‚ indicating sufficient tension.
Avoid over-winding‚ which can strain the mainspring. The manual also explains how to synchronize the clock after winding‚ often involving gently moving the minute hand to 12 o’clock and observing the cuckoo’s call. Always consult the manual for your specific clock model.
Proper procedures are key!

Resources for Cuckoo Clock Repair
Explore online forums‚ qualified technicians‚ and recommended tools detailed in the repair manual PDF‚ providing support for successful cuckoo clock restoration and maintenance.
Online Forums & Communities
Engage with fellow cuckoo clock enthusiasts and experienced repairers through dedicated online forums and communities. These platforms‚ often referenced within the cuckoo clock repair manual PDF‚ serve as invaluable resources for troubleshooting‚ sharing knowledge‚ and obtaining advice.
Members frequently post detailed questions‚ accompanied by photographs‚ seeking assistance with specific issues‚ while seasoned experts readily offer guidance and solutions. You’ll find discussions covering everything from simple adjustments to complex mechanism repairs.
Many forums also host archives of past discussions‚ creating a searchable database of solutions to common problems. Participating in these communities allows you to learn from others’ experiences‚ avoid costly mistakes‚ and potentially find specialized knowledge not readily available elsewhere. Remember to always verify information and exercise caution when implementing suggested repairs.
Links to recommended forums are often included within comprehensive repair guides.
Finding Qualified Cuckoo Clock Repair Technicians

While a cuckoo clock repair manual PDF empowers DIY repairs‚ certain issues necessitate professional attention. Locating a qualified technician ensures delicate mechanisms receive expert care‚ preventing further damage.
Seek technicians specializing in antique clocks‚ particularly cuckoo clocks‚ as they possess the nuanced understanding required for these intricate timepieces. Refer to online directories‚ clock collector associations‚ and local antique shops for recommendations.
Verify credentials‚ experience‚ and customer reviews before entrusting your clock. A reputable technician will provide a clear estimate‚ explain the repair process‚ and offer a warranty on their work. Consider the technician’s proximity‚ as shipping a cuckoo clock can be risky.
Remember‚ attempting complex repairs without proper expertise can exacerbate problems; a skilled technician is a valuable resource when the repair manual reaches its limits.
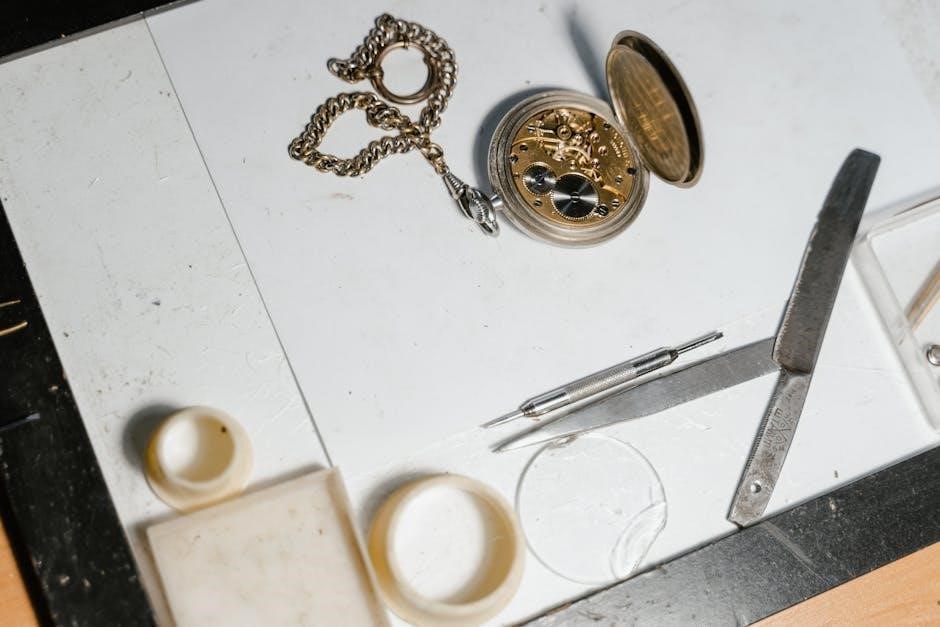
Recommended Tools for Cuckoo Clock Repair
Successfully utilizing a cuckoo clock repair manual PDF requires a basic toolkit. Precision is paramount‚ so invest in quality instruments designed for delicate mechanisms. Essential tools include a set of small screwdrivers (flathead and Phillips)‚ tweezers‚ and needle-nose pliers.
A magnifying glass or jeweler’s loupe is crucial for inspecting tiny components. Soft cloths are needed for cleaning‚ and a small brush helps remove dust. Lubricants specifically designed for clocks – not general-purpose oils – are vital for smooth operation.
Consider a pin vise for manipulating small parts and a clock hand remover for safe adjustments. A digital multimeter can be useful for testing electrical components in musical clocks. Always prioritize non-marring tools to avoid damaging the clock’s finish.
Having the right tools‚ alongside your repair manual‚ significantly increases your chances of a successful restoration.